RSS

Top 10 Rules for Staging Homes from The Stagers

1. Grab them from the curb.

You've seen them. Buyers hunkered low in their cars in front of your house, doing drive-bys before deciding whether to request a showing or attend an open house. Make these potential buyers fall in love with your home from the street by adding potted plants and flowers, power-washing patios and walkways, weeding the garden and mowing the lawn. It's your first chance to make a good impression, so you've got to make it count.

2. Make it sparkle.

Pretend that your mother or mother-in-law is coming for a visit. Think hotel clean. Mop, dust, vacuum, wash windows, baseboards — even the cat. Remember that people will look in your cupboards, under your sinks and in your closets. Also, pay particular attention to odors. You might even consider consulting a neutral nose by having a friend come by for a smell test.

3. Pay attention to color and light.

You may love hot pink in the living room, but too-bright colors turn buyers off. Neutralize strong colors for the broadest appeal. A neutral home appears larger and has less chance of offending someone. Also, open up blinds and draperies to make sure there's sufficient natural light throughout the home. Remember, lighting is the most effective way to set a mood.

4. Depersonalize.

Not only can an area rug hide shabby flooring, but it can also bring in added color and depth to a space.

Few things deter buyers more than a cluttered home. They need to see your home, not your stuff. Excessive personal items like photos, collections, personal awards, electronics and collectibles will make it difficult for buyers to see past your personal style and may deter a sale. Taking yourself out of the picture makes it easier for buyers to imagine themselves, and their stuff, in your space.

5. Consider replacing furnishings.

Think about removing or replacing worn or outdated furnishings and get rid of extra pieces. The time has come to move beyond matching furniture, so break up your sets; dated can easily become eclectic with editing and rearranging. Consider consulting with a professional staging company for design direction and advice on rental furnishings to create an inviting home with broad appeal to a wide range of buyers.

6. Invest in new artwork.

Displaying new artwork is a great way to breathe new life into a room. Photography can be used to contemporize a room and add a splash of color as well.

7. Make repairs.

Make your home a high-maintenance zone. Repair squeaky doors, chipped or smudged paint as well as broken fixtures and fittings that you've neglected.

8. Apply a fresh coat of paint.

It's the best bang for your buck that will quickly refresh a dull, dated room. Slap a fresh, neutral color on the space. Choose a beige or taupe for living spaces and a neutral green or blue for bathrooms.

9. Don't forget the floors.

Get rid of worn carpets, and consider refinishing shabby hardwood floors. An inexpensive new area rug is a quick fix and can disguise the look of old floors.

10. Spring for new light fixtures.

Renew the look of the room by replacing old or dated light fixtures, door hardware, light switches and outlets. If it's tacky and older than you, get it out of there.


Source: HGTV

Read

Spa-Inspired Master Bathroom

When it comes to remodeling your bathroom, the process of narrowing down the options is daunting. You can’t afford to do it all—no matter how much luxury you build into the space, there’s always “just one more thing” you could add. That’s why taking the time to seriously review how you use the space and setting goals for your remodel will keep you on track as you make important decisions about floor plan, fixtures, tile and more.


While you’re brainstorming ideas for your new bathroom, cut out pictures from magazines and learn about various bathroom design layouts to gain inspiration. “When my clients bring pictures and have thought about their dream bathrooms, it gives me direct insight as to what they are looking for and helps me understand what they are envisioning for the project,” says Lori Carroll, president, Lori Carroll & Associates, Tucson, Ariz.


The bathroom sanctuary is more than just a toilet, sink, shower and/or tub. The master bathroom, especially, is where you can get away from it all and unwind at the end of the day. It’s a place to soak away your worries, perhaps by candlelight or with soft music playing in the background. When you step out of the tub, your feet touch a naturally warm surface, and you can easily access bath linens. You step up to a vanity with a sink that pours water without splashing, and cabinets contain your appliances already plugged in (how convenient!). You’re not in a hurry—but if you were, you’d hop into the shower (water temperature pre-programmed) and go.


The master bathroom design is equally about function and setting a relaxing mood. Chances are, this room is shared and space allowances must be made for two. “We are seeing master bathrooms and dressing rooms being designed at the same time,” says Cameron Snyder, president, Roomscapes Luxury Design Center, Boston, Mass., and past-president of the National Kitchen & Bath Association (NKBA). He notes that the dressing room often serves as the entryway to the master bath.


Questions to ask

Here are some questions and considerations to ponder as you dream up your future master bath:

  • How many adults will use the space at one time?
  • What activities aside from usual bathroom fare take place in this room?
  • Do you want to incorporate a dressing room?
  • Do you prefer to take a bath or shower?
  • Would you rather have more counter space or two vanity sinks?
  • Do you have enough space or do you want the bathroom to be larger?
  • What features are currently in the bathroom that you would like to remove?
  • What features would you like to add to your new master bath?
  • Are there enough electrical outlets to suit your needs?
  • Which areas need better lighting?
  • What type of storage do you want/need?
  • What color scheme do you prefer?

Choosing Features

Spacious Showers

Today’s showers can include body sprays, rain shower heads, hand showers, multiple shower heads, therapeutic lights, seats, and infinity drains. A step-in shower without a curb (Roman style shower) is safe for people of all ages. Some are choosing to bundle the shower and tub in a “room,” by placing the freestanding tub in the center of the shower zone, explains Brian Johnson, principal, Collaborative Design Architects, Billings, Mt. The room’s dimensions can be 6 x 8 or 6 x 9 feet. “The tub floats in that shower space and it looks very sculptural,” Johnson says of the completely tiled area within the master bath.


Deep soaker tubs

Tubs are optional in the master bath. But if a good soak is how you like to unwind, you can add bubbly with today’s effervescent tubs and those featuring heated air jets that emit warmth and bubbles. These are replacing water-jet tubs. Also, tubs are less likely to be positioned in a corner where they take up valuable square footage. Tubs are smaller but still made for two. “You might want to consider a separate water heater for the tub if you use it often,” suggests Ken Perrin, president, Artistic Renovations, Cleveland, Ohio.


Separate toilet rooms

Hiding the loo behind closed doors within the master bath gives everyone more privacy, especially when the space will be used by more than one person at a time. Ventilation and lighting are key in this closed off space, and it’s nice to a dedicated vanity with storage if possible.


Vanity privacy

Dual sink vanities gain privacy when a shelving unit is posited between the sinks.


Sink style

Undermounted sinks offer a sleek look and make countertop cleanup a cinch.

Heated floors. Nothing says luxury like stepping on to a warm, tile floor. Radiant heat can be placed below tiles for a reasonable price—Perrin estimates about $600 or less in a small 5x9 bathroom. Johnson notes that radiant heat mats that don’t use a lot of energy are an option for specific areas in the bathroom.

Other considerations 

A natural color scheme will create a timeless, peaceful environment, from fixtures to tile. Recycled glass tiles are “here to stay,” according to Perrin, and placed sporadically throughout the bathroom, they provide interest without making the space busy.


Other features to consider:

  • Cabinets that look like furniture pieces with footed legs and antique detail
  • Steam showers
  • Tile that scales the entire wall, borrowed from European design
  • An upholstered chair or loveseat
  • Magazine rack
  • Television or stereo system built into cabinetry (or behind the mirror in the case of the TV)
  • Heated towel racks—or, as an alternative, a warming drawer that would be installed in a kitchen can efficiently do the job of warming linens in the bathroom
  • Expanded windows and skylights to let in natural light
  • The use of Japanese-style screening in walls separating the toilet and rest of bathroom so the space feels open yet private.


Source: HGTV

Read

Top 6 Kitchen Layouts

Here's a guide to the pros and cons of the most popular kitchen layouts.

Basic Kitchen Layout Types

One-Wall Kitchens

Originally called the "Pullman kitchen," the one-wall kitchen layout is generally found in studio or loft spaces because it’s the ultimate space saver. Cabinets and appliances are fixed on a single wall. Most modern designs also include an island, which evolves the space into a sort of Galley style with a walk-through corridor. 

Galley Kitchen Remodel Ideas

This efficient, “lean” layout is ideal for smaller spaces and one-cook kitchens. The galley kitchen, also called a walk-through kitchen, is characterized by two walls opposite of each other—or two parallel countertops with a walkway in between them. Galleys make the best use of every square inch of space, and there are no troublesome corner cabinets to configure, which can add to a cabinetry budget. 

L-Shaped Kitchen Designs

An L-shaped kitchen solves the problem of maximizing corner space, and it’s a smart design for small and medium sized kitchens. The versatile L-shaped kitchen consists of countertops on two adjoining walls that are perpendicular, forming an L. The “legs” of the L can be as long as you want, though keeping them less than 12 to 15 feet will allow you to efficiently use the space.

With an L-shaped layout, you’ll eliminate traffic: The kitchen will not become a thoroughfare because it’s just not logistically possible. Plus, you can easily add a dining space and multiple work zones to this layout. However, avoid this layout if your kitchen is large and can support other configurations, such as adding an island, or if multiple cooks will be using the space. 

Horseshoe Kitchens

The horseshoe, or U-shape, kitchen layout has three walls of cabinets/appliances. Today, this design has evolved from three walls to an L-shaped kitchen with an island forming the third “wall.” “This design works well because it allows for traffic flow and workflow around the island,” says Mary Jo Peterson, principal, Mary Jo Peterson Inc. “You can get more cooks into the kitchen.” 

Kitchens With Islands

A working kitchen island may include appliances and cabinetry for storage—and it always adds additional work surface to a kitchen. It can provide a place to eat (with stools), to prepare food (with a sink) and to store beverages (with a wine cooler). The island can turn a one-wall kitchen into a galley style, and an L-shaped layout into a horseshoe.

Kitchen islands are incredibly functional, but the No. 1 misperception about islands is that everyone ought to have one. The reality is, many kitchens simply don’t have enough clearance to include this feature. 

Peninsula Kitchens 

A peninsula kitchen is basically a connected island, converting an L-shaped layout into a horseshoe, or turning a horseshoe kitchen into a G-shaped design. Peninsulas function much like islands but offer more clearance in kitchens that do not allow appropriate square footage for a true island. 

Read

Five easy upgrades for your porch and patio

With daylight stretching into early evenings and warm weather headed our way, it’s time to focus on your outdoor space for the season.

Here are five easy ideas for a porch and patio upgrade:

1. Add plants.

Don’t limit your greenery to the garden. One of the fastest ways to freshen up a patio or porch space is to add plants. Consider placing a few planter boxes filled with flowers beneath your windows or add pots with greenery on either side of your front door for a welcoming entrance. If you’re lacking space on the ground, install a few hooks in the ceiling of your porch or beneath your raised deck and hang baskets with trailing plants and vines.


Tip: If you’re a beginner, cultivate your green thumb with a few hard-to-kill plant varieties. Marigolds, violets and pansies are hardy flowers that work well in containers. Check the care label on your plant to make sure it will thrive in your home.


2. Bring inside decor outside.

Indoor-outdoor living gets more popular each year as homeowners look for ways to bring nature into their daily lives. It’s helped more decor options for your outdoor space are better than ever. Bring the indoors out by adding sturdy, rust-resistant furniture to your porch or patio. Then, increase comfort and add a few pops of color with weather-resistant pillows and cushions. Illuminate your entertainment area with string fairy lights so guests can stay well past sunset.

Tip: If you have a smaller space, consider adding a sturdy outdoor mirror to your porch or patio — it can make the area seem much larger than it really is. Avoid a fire hazard by placing the mirror out of direct sunlight. And make sure the reflection won’t confuse the flight patterns of passing birds.


3. Incorporate appliances.

Whether you’re looking to add a second kitchen or need a convenient spot to wash up after a swim, more appliances are available for outdoor use. Everything from outdoor fridges and stovetops to showers are now available. Even electronics such as speakers and televisions are available in weatherproof versions to expand your living space.


4. Get some privacy.

Create a private, enclosed sanctuary on your porch or patio, and add some shade to your space, with decorative lattice or outdoor drapes. If you’d like to try a more natural solution, consider planting some trees around the yard to shield your home from the hot sun — and prying eyes. Even a small trellis with climbing vines can make a big difference in the look and feel of the area. For a more permanent solution, consider adding a screened-in porch to your property.


5. Invest in fun upgrades.

Treat yourself to a few fun things — a fire pit can make your patio area an instant gathering place that you can enjoy even on chilly nights. Or consider hiring a pro to install colourful outdoor tile to make the space pop. You can also look into increasing your outdoor seating options with fun pieces like hammocks or porch swings.


Source: The Star
Read

8 Budget Curb Appeal Projects

Glam the Front Door

Adding pizzazz to your home's front entrance is an easy, low-cost way to up your home's curb appeal. Try painting your door a pretty hue that coordinates with your home's color. "Make sure there is a contrast between the front door and the facade of the home," says Kristine Ginsberg, owner of Elite Staging and Redesign in Morris County, N.J. If your house is gray or white with black shutters, consider painting the front door red, she suggests. Other ways to beautify your home's exterior are adding appealing house numbers to your entrance and hanging a pretty wreath on the door. For extra pop, place a potted plant or two by the front entrance.

Approximate cost: A gallon of paint for the front door will cost as little as $25. Metal house numbers can be purchased for less than $4 each, while a potted mini evergreen like boxwood or a dwarf Alberta Spruce could run you less than $20.

Manicure the Lawn

Tending to your lawn is a do-it-yourself task that can add instant curb appeal to your home. Get out the lawn mower, cut the grass regularly and conquer those weeds. "I think it's always a great idea to edge your lawn for a professional look," Kristine suggests.

If you need to green your lawn in a hurry for an open house or for showings to potential buyers, you can spray your lawn with a green lawn spray paint that's especially formulated for grass, is nontoxic and is environmentally safe. You can do it yourself, or hire a professional lawn painting service.

Approximate cost: No cost to you, unless you bring in a professional to cut or green your lawn. If you artificially green your lawn on your own, you can get a quart of lawn paint, which covers up to 1,000 square feet, for less than $30. Lawn sprayers are available at a variety of price levels, but some are sold for less than $20.

Tend Those Beds

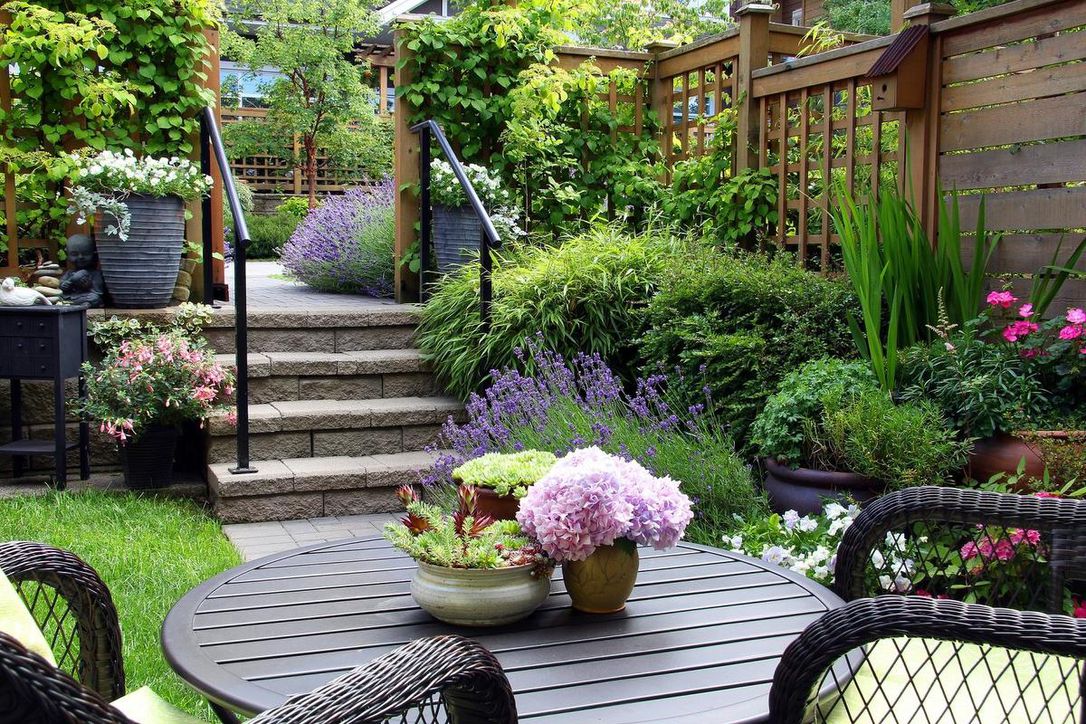
Groomed garden beds tell buyers that a home has been well maintained. Start out by weeding your planting beds and removing any debris. Buy a few bags of mulch and spread enough of it to cover the width and length of your home's front beds. The mulch will give your landscaping a fresh appearance and will keep weeds to a minimum while retaining moisture for your plants.

Try planting some annual flowers like pansies, black-eyed Susans, impatiens and petunias for quick and long-lasting color. The flowers can be bought already in bloom in low-cost flats of 12 to 48 flowers at garden and home improvement stores. "Annuals grow quickly, are inexpensive and bloom longer," Kristine says.

Consider planting brightly colored annuals in the spring and summer and plant flowers with autumn hues (reds, oranges and yellows) in the fall, suggests Joanna Seidler Farber, a Realtor associate with Davis Realtors in East Brunswick, N.J. "Changing it up every so often gives a fresh new feel and look," she adds.

Approximate cost: A 2-cubic-foot bag of mulch can be purchased for $3 or less. Online mulch calculators, like the one available from the National Gardening Association, will help you calculate how much mulch you need to purchase. Meanwhile, a flat of annuals could cost you less than $20, depending on the type of flowers purchased.

Wash Off Dirt

Turn the nozzle on your garden hose to its strongest setting and use the water to blast dirt and debris off sidewalks, your driveway and the front of your home. Be careful not to dislodge or get any water underneath your home's siding. You could rent a power washer at an extra cost, but you probably don't need to go to the trouble — a simple garden hose can do the job, and a power washer can be too powerful and could damage siding.

"If you do use a power washer, don't put it close to windows or doorways," suggests Stephen Boehler, owner of Mr. Handyman of NE Monmouth County in New Jersey. "The pressure can remove caulk and other materials sealing your home."

Cost: Absolutely nothing (minus the cost of water), if you use a garden hose. Renting a power washer will run you about $40 to $75 a day depending on your location and the quality of the equipment. If you'd like to purchase a pressure washer, there are various options available for between $120 and $150 at big home improvement stores.

Tidy Up the Driveway

Buyers won't be impressed by your garbage or recycling containers, so store those on the side of the house (preferably behind a bush, a small fence or a screen) or in the garage. Take care of minor cracks in your driveway by patching or resealing it yourself. Determine how much sealant you'll need by using the length and width of your driveway to calculate its square footage. Then match that up against the product's use recommendations. "Plan on getting 10 percent extra because some areas will absorb more than others," Stephen says. "You can always return unopened pails of sealer."

Stash your car in the driveway or down the block to give your driveway and the approach to your home a neater appearance.

Approximate cost: To DIY seal an average 1,000-square-foot asphalt driveway should cost about $100 to less than $150, depending on the quality of the sealant used.

Make the Windows Sparkle

Clean windows inside and out to make your home sparkle. If your home's windows tilt out, it's quite simple to wash exterior windows. Otherwise, you might need a friend or family member to steady a ladder while you do the work. Try washing outside windows by spraying them with a garden hose to remove dirt and cobwebs. Then sponge them down with a small amount of vinegar or detergent diluted in warm water and rinse. If you need to wash your windows from the outside and your windows don't tilt out, try using a long-handled brush.

Approximate cost: Next to nothing, if you wash the windows yourself. But if your windows are high up and you need to rent a ladder, a 14-foot ladder will cost about $25 to rent for four hours from a big-box home improvement store.

Update Light Fixtures

Removing builder-grade or outdated front door or garage light fixtures will instantly brighten your home's curb appeal. "This is often done by homeowners with a great success rate," Stephen says. "Make sure the breaker inside the electric panel is shut off for where the light is being installed." Before touching any wires, test them with a live-wire testing device, he suggests.

If you don't want to go to the expense of buying new light fixtures, you could try painting or spray-painting your old ones for a fraction of the cost. "If you have outdated light fixtures like 1980s gold, the quickest fix is to paint the light fixture black," says Cindy Lin, general manager/founder of Staged4More Home Staging in South San Francisco.

Approximate cost: A 12-ounce can of spray paint costs less than $8, while attractive wall-mounted exterior lights can be purchased for less than $30 each. A live-wire tester costs less than $20.

Trim Trees and Bushes

Your home needs to be visible from the curb in order to have curb appeal, so cut overgrown bushes and trees, removing branches that block walkways, windows, the driveway and views of the home from the street. "People need to see the front of the house," says Kristine.

Except for very large tree limbs, you most likely can use a pair of hedge or pruning shears for the job. If you don't have your own pair of shears, look into borrowing a set from a friend or neighbor to keep costs down.

Approximate cost: Nothing, if you own a pair of shears, have extra time or have friendly friends or neighbors. If you need to purchase your own shears, expect to pay between $10 and $50.


Source: HGTV

Read
The trademarks REALTOR®, REALTORS®, and the REALTOR® logo are controlled by The Canadian Real Estate Association (CREA) and identify real estate professionals who are member’s of CREA. The trademarks MLS®, Multiple Listing Service® and the associated logos are owned by CREA and identify the quality of services provided by real estate professionals who are members of CREA. Used under license.