
If your new workout routine has you breaking a sweat from home instead of inside a crowded gym, chances are you have a bunch of clutter gathering around your fitness equipment (hello, new stationary bike and dumbbells!). Solve that problem with an easy to build French cleat wall organizer and you’ll be even more motivated to get your sweat on. Read on for seven simple steps to create this snazzy shelf for yourself.
Materials:
● 1 sheet of 3/4” plywood
● 1” solid wood material for frame and individual organizers
● Brad nails
● Wood glue
● Stain and/or finish
● Hardware to hang organizer on the wall (ensure it’s adequate for the weight of the organizer)
Tool Requirements:
● Table saw
● 18-gauge brad nailer
● Tape measure
● Square
● Safety protection (i.e. safety glasses, dust mask, hearing protection)
● Screw driver
Step One: Cut the Plywood
Cut the plywood to your desired size. Keep in mind that the final product will be quite heavy upon completion. This example was four feet wide and three feet high.
Step Two: Create the French Cleats
To create the French cleats, cut 2” pieces from the remaining plywood using the table saw. For this example, you’ll need nine pieces. Then adjust the table saw to 45 degrees and cut a 45-degree bevel on each 2” cleat. Finally, mark out with a pencil and cross cut each cleat to the exact length of the plywood instead of using a tape measure. During this step, make a few extra cleats to use as backing for the organizer units in step five.
Step Three: Attach the French Cleats
Put some glue on the bottom of the first cleat and line it up with the bottom of the plywood using a square. Use brad nails to secure the cleat in place. Use a scrap piece of the 2” plywood to space out the next cleat and repeat the process of gluing and nailing for the remaining French cleats.
Step Four: Create the Frame
For the frame, you’ll be cutting four pieces of 2” wide trim from the 1” solid wood. Measure the top and bottom of the plywood first and then the sides before cutting the lengths. The sides will be longer than the plywood because the width of the top and bottom frame will be added. Once all four sides are cut, glue and brad nail them to the plywood.
Step Five: Build Your Organizer Units
With the remaining 1” solid wood, create whichever type of organizer units will work best for you. To do this, measure, cut, glue and nail together the boxes or shelves. Once the shelves and boxes are created, using the spare cleats you made in step two, cut them to their appropriate lengths for each organizer unit and attach them to the back of each unit using glue and brad nails. Check that the cleats will be “level” by making sure they are the same distance away from the top of the unit, along the entire length of the cleat.
Step Six: Apply the Final Touches and Secure to Wall
Sand everything down for a nice smooth finish. Apply a stain colour of your choice to the entire organizer as well as the organizer units. Follow the directions of the chosen stain for the best results. Attach the hardware that you’ve chosen for the organizer to the back of the organizer and to the wall. Remember to ensure it is adequate to handle the weight. The hardware should be screwed into wooden studs when possible. For this organizer, a low profile aluminum French cleat was used, which can be found at specialty woodworking stores. And finally… hang your new shelf!
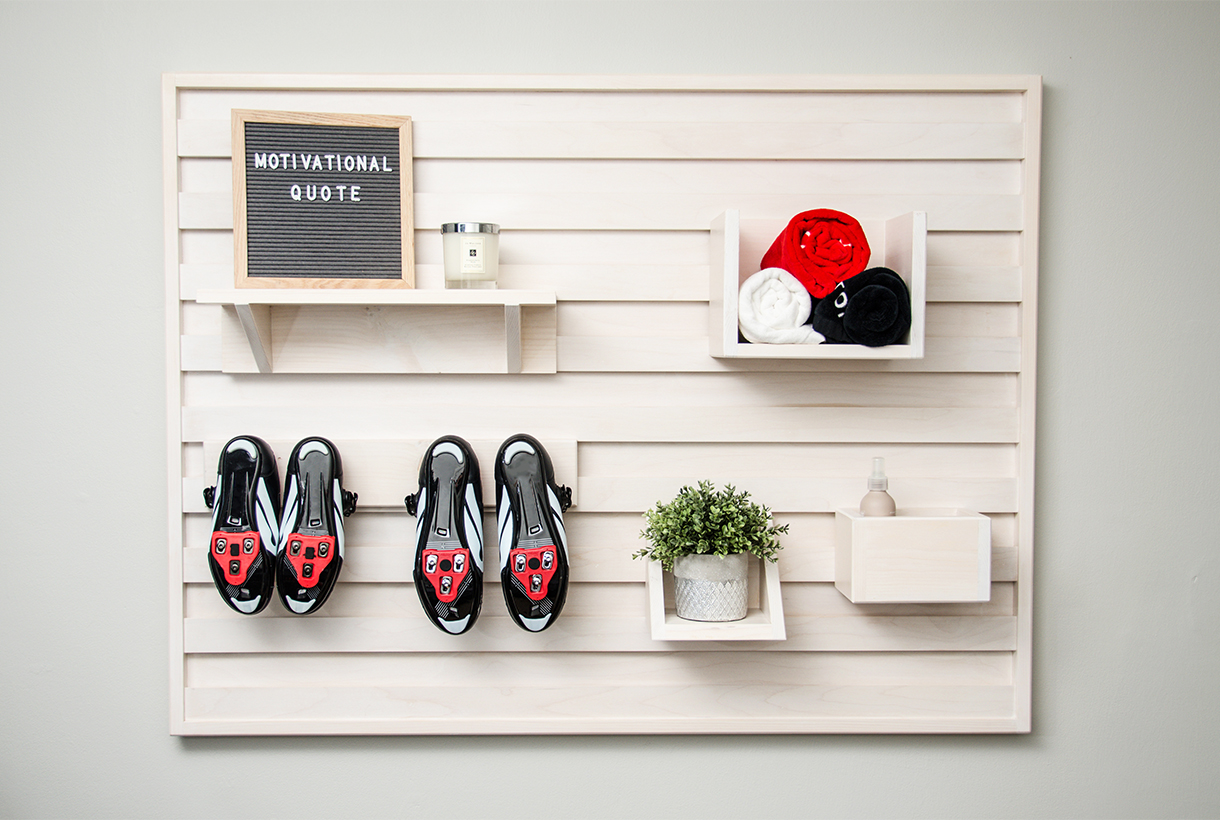
Step Seven: Decorate!
Position each unit where you’d like and fill it up with your personal items. The best thing about a French cleat organizer design is that it’s modular: you can add and subtract different units/shelves whenever your needs for the organizer change.
Source: HGTV


Comments:
Post Your Comment: